

[ad_1]
 Whats up readers, I hope you all are doing nice. That is the primary tutorial of our Raspberry Pi programming sequence. On this tutorial, we’re going to present a quick description of the Raspberry Pi Pico module designed and developed by the Raspberry Pi group itself. We will even focus on numerous options, reminiscence, peripherals interfacing capabilities, {hardware} structure, programming methods and many others.
Earlier than transferring in direction of the detailed examine of the Raspberry Pi Pico module, let’s first perceive the normal Raspberry Pi Computer systems.
What’s Raspberry Pi?
Raspberry Pi is a single-board laptop or a minicomputer. It was created with the aim of constructing computing information extra accessible to those that can not afford laptops or desktop computer systems, in addition to creating programming expertise at a decrease value. The Raspberry Pi group designed it.
The Raspberry Pi is a low-cost laptop that features some GPIOs (Common Goal Enter-Output) for connecting to and controlling peripherals. Even though the Raspberry Pi’s processing velocity is far slower than that of desktop computer systems and laptop computer computer systems, it’s nonetheless a pc with the entire processing and interfacing capabilities and low energy consumption.
A Raspberry Pi can be utilized to create {hardware}, house automation, industrial purposes and many others.
There are numerous Raspberry Pi fashions obtainable and Raspberry Pi Pico is one in all them.
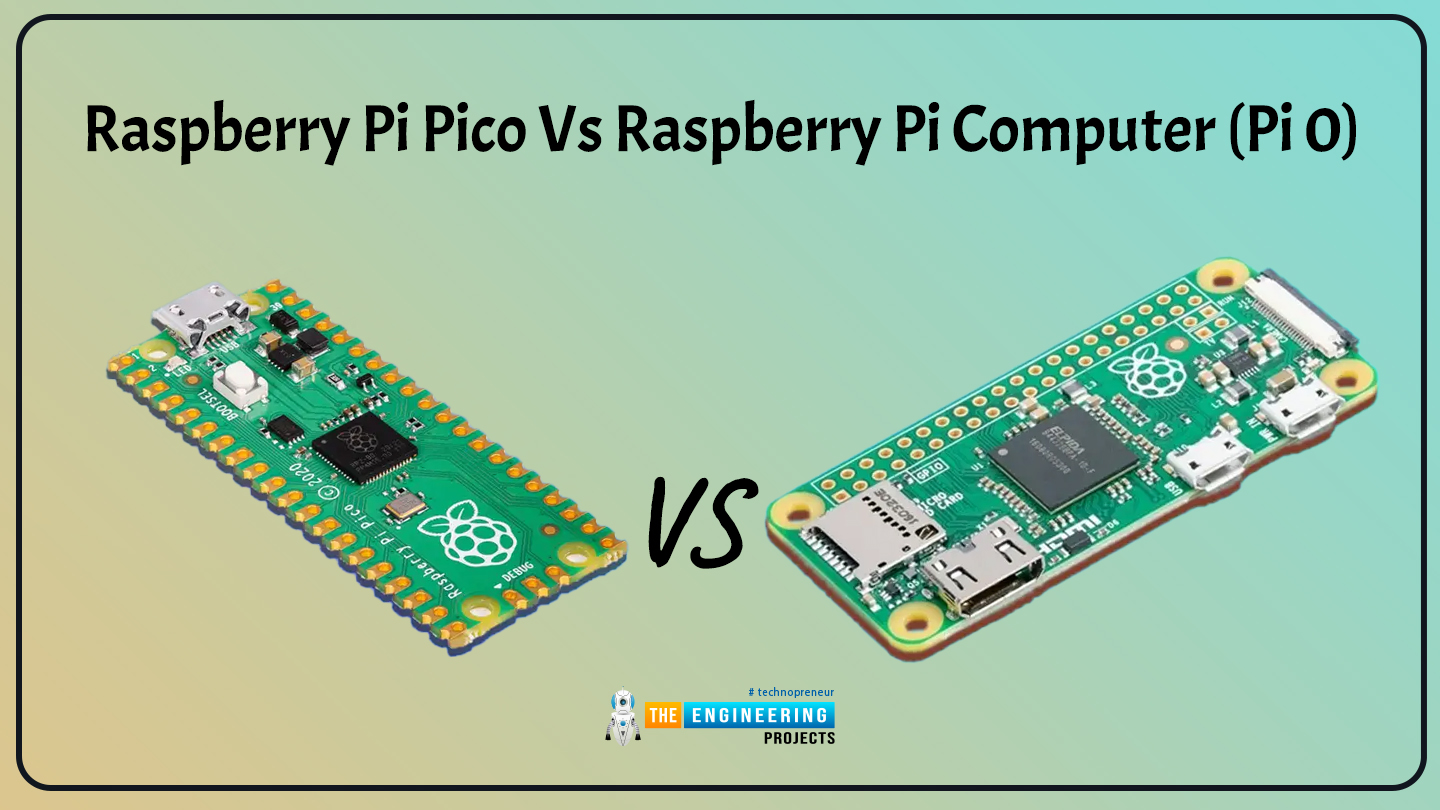
Fig. 1 Raspberry Pi Pico Vs Raspberry Pi Laptop (Pi 0)
Raspberry Pi Pico
Raspberry Pi Pico is a very totally different mannequin or system than conventional Raspberry Pi fashions. Raspberry Pi Pico shouldn’t be a Linux laptop, however it’s a microcontroller like numerous obtainable Arduino boards.
It’s a cost-effective growth platform designed by Raspberry Pi which has sufficient processing energy to deal with complicated duties. It’s a low-cost but highly effective microcontroller board with an RP2040 silicon chip.
Just like the Raspberry Pi laptop, Raspberry Pi Pico can also be featured with a processing unit, GPIO (so it may be used to manage and obtain inputs from numerous digital peripherals) and many others. however it doesn’t provide any wi-fi connectivity function.
Different obtainable Raspberry Pi boards like Raspberry Pi 0, Raspberry Pi 4, 3 and many others. are just like a conventional desktop laptop. This implies they’ve all of the options to work as a pc like, an HDMI port to attach a monitor, USB ports for mouse and keyboard, SD card slot for OS and many others.
However, Raspberry Pi Pico doesn’t have any of the above options or capabilities, neither an HDMI port nor the USB for keyboard and mouse connectivity and as an alternative of utilizing an SD card for storage Pico mannequin is featured with ‘Onboard flash reminiscence’ to retailer applications.
So now you may need a doubt, that whether or not one can run a Raspberry Pi OS on a Raspberry Pi Pico or not? The reply is, NO. Not like conventional Raspberry Pi modules, Raspberry Pi Pico doesn’t run a full desktop OS (working system) however it runs code straight with out a desktop interface.
When you’ve got an Apple, Linux or Home windows laptop or perhaps a totally different Raspberry Pi board (Pi 0, 4 or 3 and many others.) then, you simply have to plug the Raspberry Pi Pico into a pc to program the board for a particular process or venture. As soon as the Pico is programmed efficiently, it would run that code each time the board is powered ON.
So we are able to say that Raspberry Pi Pico is extra like an Arduino board than a conventional Raspberry Pi mannequin.
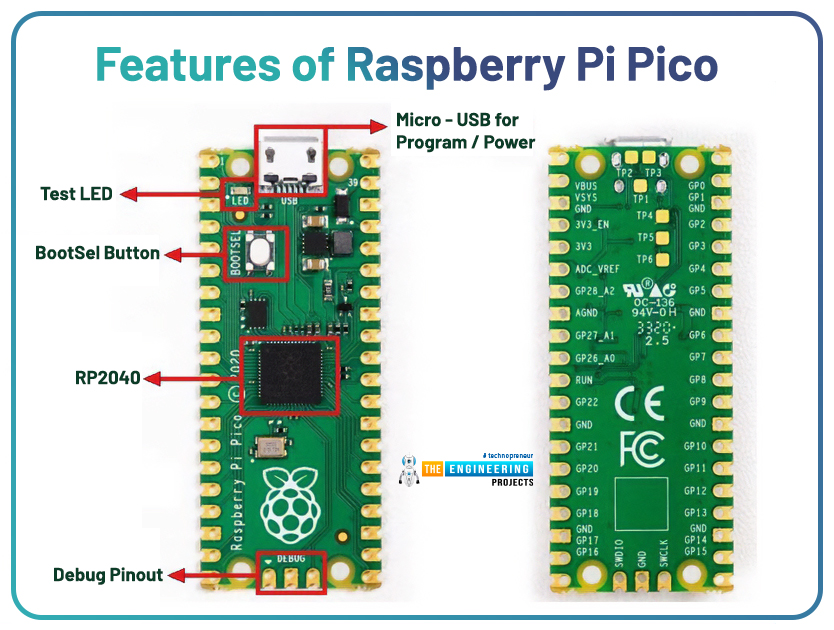
Options of Raspberry Pi Pico
Fig. 2 Raspberry Pi Pico growth board
Some key options of the Raspberry Pi Pico board are:
- Twin-core processor (ARM Cortex-Mo+), 133Mhz
- DMA controller
- It helps 16MB of Flash reminiscence by way of QSPI bus
- 264kB of on-chip static RAM(SRAM)
- SP2040 microcontroller chip designed by Raspberry Pi group
- A micro USB (sort B) port for powering and programming the board
- AHB crossbar
- 2 on-chip phase-locked loops or PLLs to generate USB and core clocks
- Programmable on-chip LDO to generate a core voltage
- 26 GPIO pins with 23 GPIO pins are digital-only and the remaining 3 pins are having ADC capabilities
- 3 pin ARM SWD (Serial wire debug) port
- 2MB onboard QSPI Flash
- Raspberry Pi Pico board operates at a variety of 1.8 – 5.5V DC energy provide.
- Working temperature: -20˚C – +85˚C
- Raspberry Pi Pico board additionally helps drag-and-drop programming utilizing mass storage over a USB.
- RP2040 additionally affords on-chip floating-point libraries.
- Constructed-in temperature sensor.
- A number of digital peripherals supported by RP20400 are:
- 1 real-time counter
- 2 UART channels
- 2 I2C
- 2 SPI (Serial Peripheral Interfaces) channels
- 16 PWM (Pulse width Modulation) channels
- Top quality and efficiency at a really low value
- It additionally helps low energy sleep mode and dormant mode
This module additionally affords an onboard buck-boost SMPS (change mode energy provide), which gives a versatile possibility for powering the board by way of a micro USB port, batteries or exterior provides.
Together with numerous obtainable peripheral interfacing modules and knowledge communication capabilities, the Raspberry Pi Pico additionally affords, 8 PIO state machines, a USB 1.1 controller.
The Raspberry Pi Pico growth board has been designed to make use of both a soldered 0.1″ pin-headers or will also be used as a surface-mountable system (SMD) or module, because the consumer IO (enter/output) pins are additionally castellated.
Microcontroller (RP2040)
Raspberry Pi Pico comes with a dual-core microcontroller RP2040 chip, the chip is totally designed in-house at Raspberry Pi.
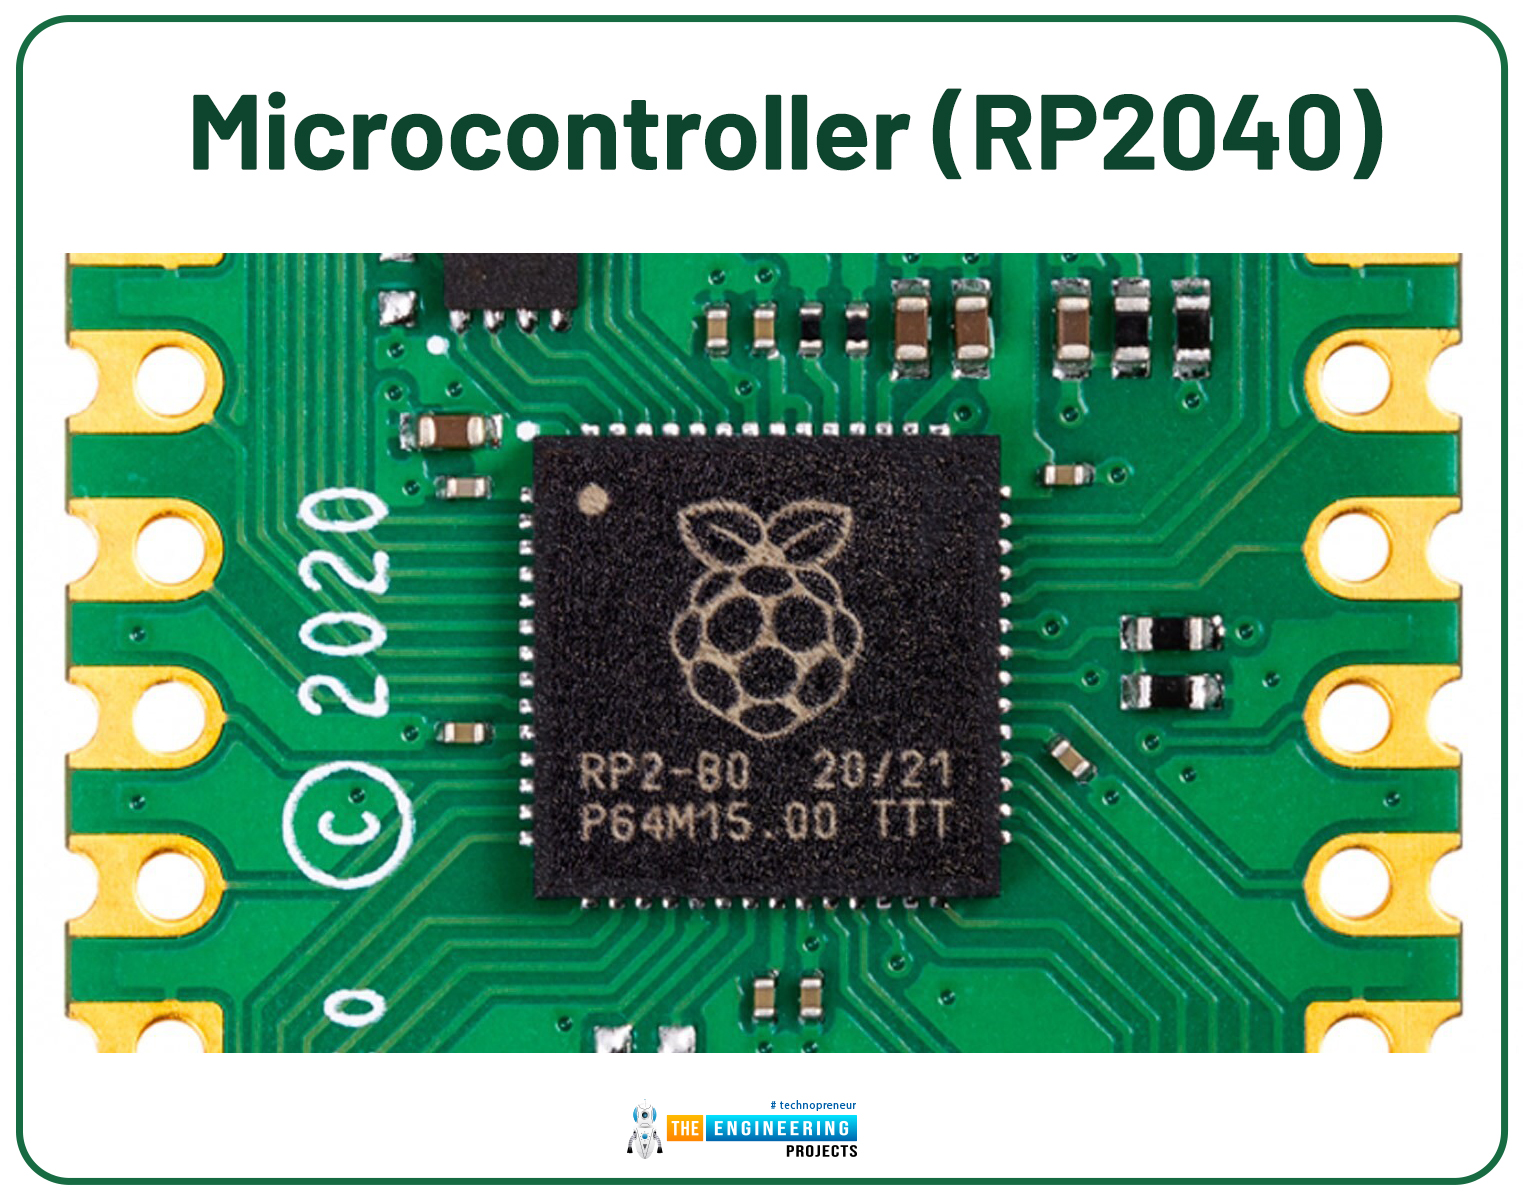
Fig. 3 RP2040 Microcontroller
RP2040 is the primary microcontroller from Raspberry Pi. It’s manufactured on a 40nm course of node, which offered low energy consumption functionality and quite a lot of low energy modes to supply prolonged length operation on battery energy.
The RP2040 microcontroller board consists of complete of 36 GPIO pins however solely 26 GPIO pins are uncovered for management and interfacing.
Now let’s perceive why this microcontroller is known as so!
- In RP2040, RP stands for Raspberry Pi.
- The primary digit ‘2’ represents the variety of processing cores.
- The second digit ‘0’ represents the kind of processor i.e., Mo+
- ‘4’ represents the quantity of RAM, from the purposeful ground (log2 (RAM/16kB)
- The final digit represents the quantity of non-volatile storage and ‘0’ signifies no non-volatile storage.
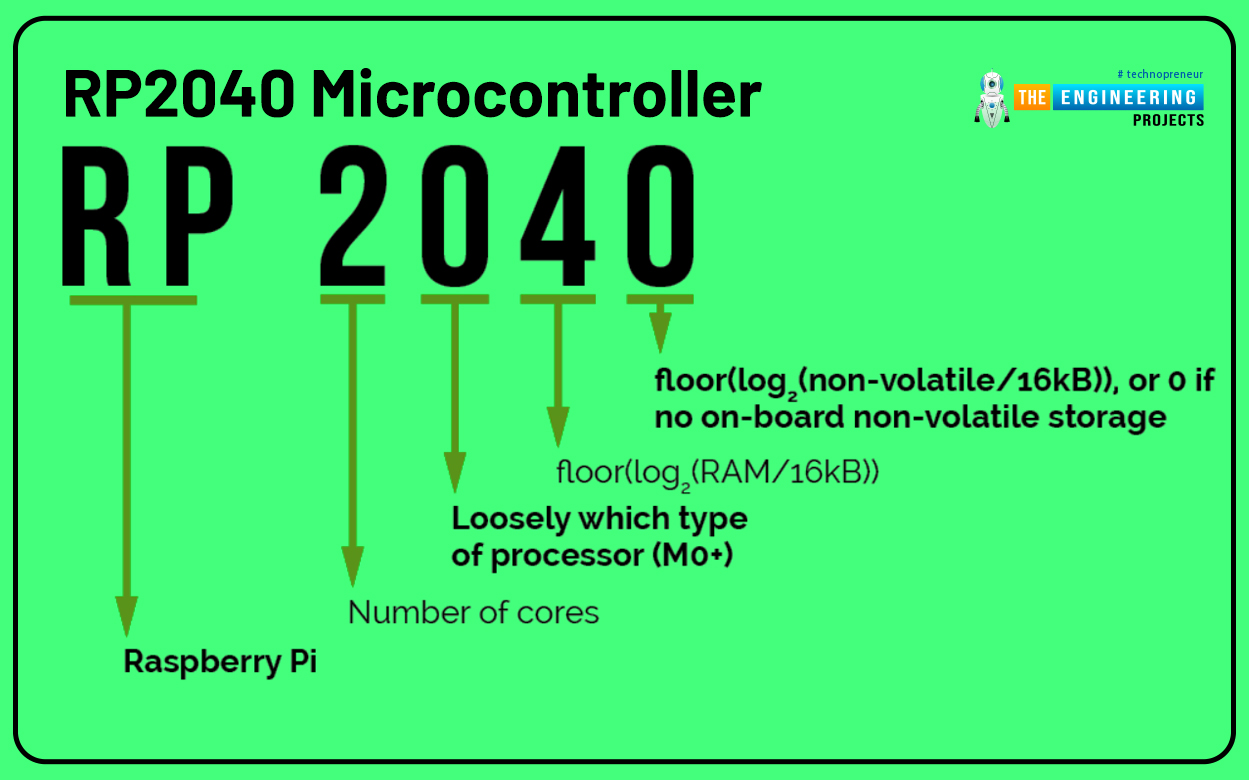
Fig. 4 RP2040 microcontroller
Communication protocols
A few of the communication protocols or strategies supported by the raspberry Pi Pico mannequin are:
- UART ( It affords 2 UARTs)
- 2 SPI (Serial peripheral interface) controllers
- 2 I2C controllers
GPIOs
Like a Raspberry Pi laptop, Raspberry Pi Pico additionally featured with GPIO pins to manage & interface peripherals or to speak knowledge with peripherals and even to obtain inputs and management alerts from these peripherals.
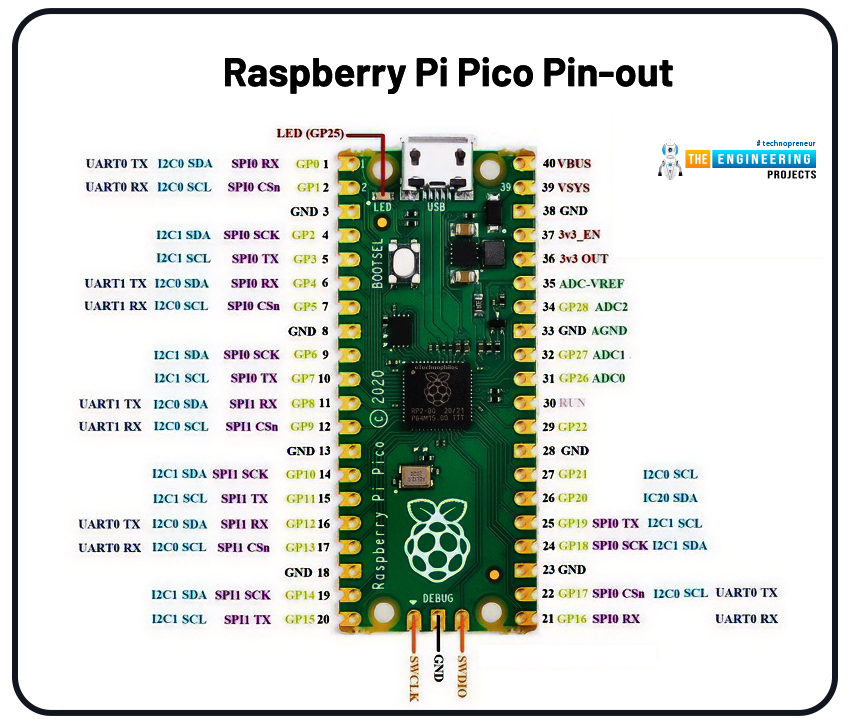
Fig. 5 Raspberry Pi Pico Pin-out
The Raspberry Pi Pico pin-out reveals that it has 40 pins in complete, together with the facility provide pins ( GND and VCC pins). PWM, ADC, UART, GPIO, SPI, I2C, debugging pins, and system management pins are the several types of pins.
Not like the Raspberry Pi laptop board sequence, the Pico board’s GPIO pins serve a number of functions and in complete Raspberry Pi Pico has 26 multifunctional pins. These 26 multi-functional pins are marked as GP0, GP1, GP2 and so forth. They can be utilized to carry out each digital enter and digital output capabilities.
For instance, if we take into account the GP4 and GP5 pins, they can be utilized as both a digital enter or digital output, as can I2C1 (SDA and SCK pins) or UART1 (Rx and Tx). However, just one perform can be utilized at a time by deciding on a specific pin and offering the respective directions within the code.
- PWM pins: Raspberry Pi Pico has 16 PWM output channels. Truly, it has 8 PWM blocks and every PWM block gives two PWM outputs and therefore a complete of 16PWM channels.
- ADC pins: Raspberry Pi Pico board has 4 ADC pins to learn analog inputs from peripherals (sensors) out of which solely 3 ADCs and usable.
A 12- bit ADC is supported by the RP2040 Pico board and thus the ADC vary can go from 0 to 4095.
The MicroPython code, then again, can scale the ADC values to a 16-bit vary. In consequence, we have now a variety of 0 to 65535. As a result of the microcontroller operates at 3.3 V, an ADC pin will return a worth of 65535 when 3.3 V is utilized to it or 0 when no voltage is utilized. When the voltage utilized or the enter voltage is within the vary of 0 to three.3 V, we are able to get hold of the entire in-between values.
- UART pins: if in case you have beforehand labored with any microcontroller board or growth board you then may need used this protocol as a result of that is essentially the most generally or often used serial communication protocol. Raspberry Pi Pico module additionally affords two UART channels, particularly UART0 and UART1 and devoted GPIO pins can be found to implement this protocol.
Fig. 6 Raspberry Pi Pico Communication protocols
- I2C pins: I2C is a bidirectional serial bus (Two Wire) that’s used to speak knowledge amongst I2C enabled gadgets however over a brief distance. In raspberry Pi Pico there we have now two I2C controllers, that are simply accessible by way of GPIO pins.
- SPI pins: SPI stands for Serial peripheral interface and it’s used to speak knowledge between SPI enabled gadgets over a devoted or obtainable GPIO pins. Raspberry Pi affords 2 SPI channels for peripheral interface.
- Energy Provide Pins: Some energy provide pins are additionally obtainable to energy up the board:
- SMPS: This pins is used to generate the three.3V for the Pico board and its GPIOs
- VSYS: That is the first enter voltage and will be different in 1.8v to five.5.V provide vary.
- VBUS: The micro USB enter voltage related to the pin1 of micro-USB port.
- GND pin
Another options of Raspberry Pi Pico are:
Labeling
The silkscreen labeling on the highest aspect of the board gives an orientation for 40 pins, whereas a full pin-out is printed on the rear.
USB
Raspberry Pi Pico comes with a USB 1.1 controller. This USB port is used to energy up the board and program the Raspberry Pi Pico.
Bootsel
A BOOTSEL button is accessible on the Raspberry Pi Pico growth board which implies Boot Choose. This button is used to place the board into USB mass storage mode whereas powering up the Pico board. This enables the consumer to pull and drop applications into the RPI-RP2 mounted drive.
Debugging
An SWD which stands for Serial Wire Debug is offered for {hardware} debugging and letting the consumer rapidly monitor the issues down in this system.
Programming the Flash
As we talked about earlier, the Raspberry Pi Pico affords 2MB of on-board QSPI flash reminiscence which will be programmed or reprogrammed by way of utilizing both the SWD (or Serial Wire Debug) port or utilizing a particular USB mass storage system mode.
An Inner Temperature sensor
Raspberry Pi Pico module comes with an inbuilt temperature sensor. The sensor is internally related to the ADC or analog to digital converter pins of the Raspberry Pi Pico board. These ADC pins, helps a variety of values and that’s decided by the enter voltage utilized to the pins.
Programming Raspberry Pi Pico(2040)

Fig. 7 Programming Raspberry Pi Pico
There are a number of growth environments obtainable that assist totally different programming languages to program the RP2040 microcontroller.
However, earlier than writing a program for Raspberry Pi Pico you need to have all of the software program and {hardware} elements required to program the board.
Elements required to program Raspberry Pi Pico:
The very first thing required is a Micro-USB Cable, which permits the consumer to attach it to a pc or a Raspberry Pi for programming and powering up the Pico board.
The following element is the event setting required to compile and add this system into the Raspberry Pi Pico growth.
If it’s essential to interface a peripheral along with your Pico board utilizing a breadboard then, you additionally want a set of Pico Headers.
RP2040 helps a number of programming languages like C/C++, Circuit python, MicroPython cross-platform growth environments. Raspberry Pi Pico module consists of a built-in UF2 bootloader enabling applications to be loaded by drag and drop and floating-point routines are baked into the chip to realize ultra-fast efficiency.
There are a number of growth environments to program a Raspberry Pi Pico board like Visible Studio Code, Thonny Python IDE and Arduino IDE and many others.
In our subsequent tutorial, we’ll focus on the set up of the event setting for Raspberry Pi Pico and get began with the respective growth setting.
So, this concludes the tutorial. I hope you discovered this of some assist and likewise hope to see you quickly with a brand new tutorial on Raspberry Pi.
[ad_2]


0 Comments